Every November we put on an event called Gifted2Give, an afternoon where participants can make holiday gifts for only the cost of materials. It’s a fun day of crafting, music, snacks, and holiday cheer!
Here on the blog we’re going to be posting some of the crafts we’ve done at Gifted2Give over the years. First up, cork-backed coasters!
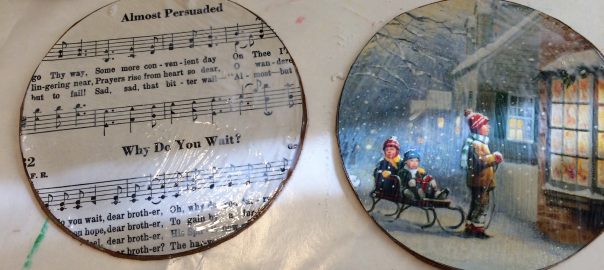
Coasters are best to gift in a set of 2 or 4. You’ll need thin cork sheets for the back, and pretty maps, cards, or sheet music for the decorative tops of the coasters.

You’ll also need something circular that’s slightly larger than a large coffee mug to use as a template, some good scissors, and a good decoupaging glue like Mod Podge.

Using your circular template (Kaye suggests that a plastic lemonade-mix container is a good size!), cut out circles of cork, and circles of your decorative top layer.

Kaye advised you can get sheets of cork at Lowes, both with and without a sticky backing. We used the ones with a sticky backing because it’s so much easier to just peel off the paper and apply the decorative top layer, no additional glue needed (yet).

After you’ve lined up your decorative top-layer on top of the cork backing, you’re ready to apply the decoupage glue to seal your coasters.


You’ll need to apply a layer of Mod Podge, let that dry for about ten minutes, and then apply another layer. Let the final layer of glue dry for at least 24-hours before packaging them up. Tying up your set of coasters with raffia or ribbon is a nice, easy way to keep them together!

The best part of this gift is that you can so easily customize it to match what your gift recipient likes! Sheet music for a music-lover, maps for a traveler, there’s no end to how you could make these for your loved ones.
Stay tuned for more Gifted2Give crafts, coming right up!


