Summer days found school-aged me trolling library shelves for reads. Drawn to titles, authors, and book covers, I nabbed one after another, silently counting (it was a library, after all, SHHHH!) up to my check-out limit. I ferried the stack to the librarian’s desk, where each book was stamped with the return date, sorted by size—large to small—and slid across the desk into my waiting hands. Dropping the stash into my bike basket, I pedaled home, grabbed an apple and Book 1 on my “Must Read” list, and set out in search of a shade tree.
Those summers, leaning against a tree, I traveled the world, discovered folk takes and traditions of other cultures, dived sea depths and rocketed into space. I walked alongside history’s giants and stared up at a blade of grass through the eyes of an insect. I was free to choose and to read whatever peaked my interest. The only exception was when my mother nixed fairy tales for a time, because I was reading the Grimms brothers and Hans Christian Andersen’s more grisly tales and having nightmares. The magic of those tales stayed with me, however, and I revisited them, sans nightmares, in later years.
No question: child development and temperament must be considered in a child’s reading material. My mother served me well in saying, “not now.” But “not now” is a far cry from depriving the child of even knowing a book exists. The first choice comes from love and hope. The second from control and repression.
That’s why we’re hosting our Banned Book Speakeasy. Just as, during prohibition, legislators banned alcohol in an attempt to force their morality on others, now, across our country, laws are being passed to ban books that some people, and the politicians who wish to please them, find offensive. At A Spacious Place, we stand with authors speaking their truth in print, and with readers who open their minds to read that truth. Sometimes that truth connects with our personal story, and that is a gift. Sometimes that truth is not ours and gives us the opportunity to clarify what we believe and why. That, too, is a gift, though a grittier one.
We stand against laws that seek to rein in or destroy art; we stand for the freedom to read. We hope you’ll join us as we gather at the Speakeasy to open a book and open our minds.
What are your favorite reading memories? What are your thoughts on book freedom and book banning? Share your thoughts with us at contact@aspaciousplace.com.
Tag Archives: Gift
Gifted2Give: Duct Tape Belts
Wearable gifts are always a hit at Gifted2Give, and who doesn’t love the incredible versatility of duct tape? Add in all of the neat patterns you can find it in and we’re in gift-customizing heaven. 🙂
Here’s how to make a duct tape belt!
First, some tips:
- It helps to have a long table for laying out the belts.
- Also, keep fingernail polish on hand to clean the scissors, since the duct-tape glue gunks them up.
You’ll need:
- Various cool patterns of duct tape (camo, sports teams, and animals prints always go over well)
- 1 1/2″ D rings for the large belts (we get a variety of silver, gold, and nickel)
- Binder rings for the small belts (these only come in silver, I think)
- A long strip of posterboard 1 1/2″ wide, to act as a sizer
- Scissors
- Pens
Wrap the posterboard sizer around your waist to get a measure of how long to make the belt.
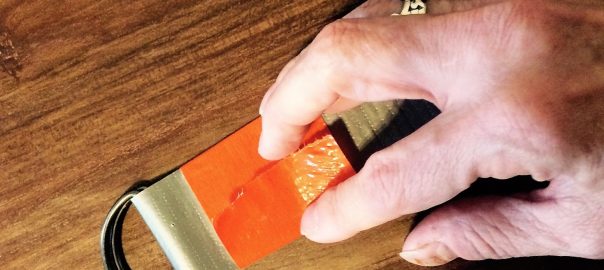
Keeping your finger on the right spot on the sizer, lay it out on the table. Stretch a piece of duct tape to that length plus six inches. Stretch out another piece the same length.
Carefully match up both pieces of tape, sticky-side to sticky-side, until you have one long piece of duct tape with the design on both sides and no sticky-side showing.

Since the duct tape is 2″ wide, and the D-rings are only 1 1/2″, you’ll need to cut the tape down to the narrower size. Lay the sizer on top of the belt, and trace the edge with the pen. Then use the scissors to cut the edges off the belt.


Now take two D rings and slide them over one of the ends of the belt. Fold the end of the belt over the D rings and tape it to secure the rings in place. You can use either the same pattern of duct tape for this, or a different color or pattern for a cool contrast effect.


**Want to make a thinner belt? Using only one strip of tape, fold it length-wise in thirds, then use the binder rings instead of the D-rings.**

Now you can wear your belt! What colors and patterns would you use for a duct tape belt? Or what colors and patterns would you use for a duct tape belt gift?
Gifted2Give: Tape-Transfer Word Jars
Another fun gift-worthy craft! We made this at last year’s Gifted2Give event with winter holiday gift-giving in mind, but as there’s always a fun holiday coming up they can really be a year-round activity. Valentine’s gift, perhaps? 🙂
First, a few tips from Kaye!
- To get the labels off of the glass jars, I discovered that soaking them in hot, soapy water for a day helped get off most of the labels. With the really stubborn ones, I followed up with a paste of baking soda and vinegar, and with even more stubborn ones I used fingernail polish remover. Some just were too hard to remove, so don’t feel bad if you try and try and one or two still won’t fully come off! Just use the other ones.
- Rounded sides on jars made adhesion more difficult, because the transfer can’t lie flat. If you can find more flat-sided jars, use those!
- When making the transfers, soak, remove the paper, and let dry sticky-side-up for a few minutes. Once dry, the tape will become sticky again.
- You’ll need to print your chosen words using a laser printer, as the inkjet printing process doesn’t allow the ink to be separated from the paper with this method.
Let’s get started!
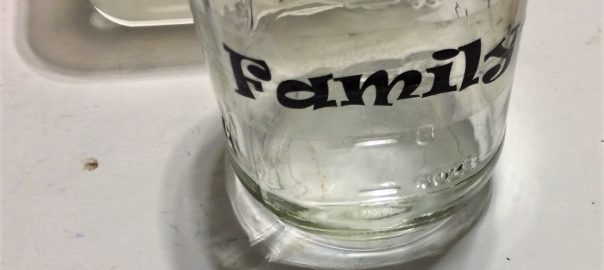
- Choose the word you would like to put on your jar. We printed out words like Family, Love, Peace, and Gratitude. You can go serious or funny with your words/phrases, or you could use the recipient’s name, too.
- Print your words and phrases using a laser printer.
- Cover your printed words with clear packing tape. Try to cover each word with just one piece of tape so you don’t have any seams in your final label.
- Using your thumbnail or the back of a spoon, burnish the tape firmly all over the word. You want the tape to be as completely and firmly adhered to the paper as possible.

- Cut out your word or words, leaving a border around the edges. The shape of tape that you cut out in this step is the shape that the final label will be, so keep that in mind.

- Choose the jar you’d like to label. Make sure the word you chose fits on the jar!

- Fill a small bowl or plastic container halfway with water. Submerge your word fully in the water for 1.5-2 minutes. The entire strip of paper needs to be fully submerged the whole time.

- Remove the paper from the water and begin to rub the paper-backing off of the tape. If it doesn’t all come off you can soak in the water again until you can rub all of the paper off.

- Once all of the paper is removed, lay the label sticky-side-up on a paper towel. Let dry three minutes so the tape will regain its tack.

- Once its dry, apply your custom label to your jar! Smooth out any bubbles with your finger.

- For added decoration you can tie a ribbon around the neck of the jar, or glue some along the edge of the jar lid. Now your jar is ready to gift!

These would be so fun to fill with homemade bath salts, or cookie mix, or a bunch of new colored pencils, or a bunch of fun notes to your giftee… Anything you think they would like! What word would you put on a jar as a gift? What would you put inside it? It’s so fun brainstorming what your loved ones would like as a gift, isn’t it?
Gifted2Give: T-Shirt Headbands
Another gift-able item we made at this year’s Gifted2Give was t-shirt headbands! This was a new craft for 2016 and it was a HUGE hit.
Here are Kaye’s notes on prepping the materials for this craft:
- From the t-shirts, cut strips at least 4 inches wide across the width of the shirt.
- You can start at the hem, so you don’t need to cut that portion off.
- I found that medium to large size shirts worked best. Smalls were too tight unless paired with a strip from an extra-large shirt, and the extra large ones were too large, unless paired with a small.
And here’s how to put one together!
Take two t-shirt strips. They can be the same color or different, coordinating colors.

Form each into a “V” shape, then interlock those Vs.


Bring the ends of one band together, and stitch an anchor stitch in each corner. Repeat with the other band.


Stretch the bands, if needed, to fit around the head.

Line up the ends of the bands and whip-stitch all four layers together, first in one direction, then in the other.


Then pop it on, your headband is ready to wear!

This is another great gift that you can customize SO easily for your gift recipient. Use their favorite color, or their favorite sport team colors, or make some in various holiday colors; there are just so many great options!
Did you make any gifts for the holidays this year? Tell us about it in the comments! We’re always looking for new ideas for the next Gifted2Give!
Gifted2Give: Cork Coasters
Every November we put on an event called Gifted2Give, an afternoon where participants can make holiday gifts for only the cost of materials. It’s a fun day of crafting, music, snacks, and holiday cheer!
Here on the blog we’re going to be posting some of the crafts we’ve done at Gifted2Give over the years. First up, cork-backed coasters!
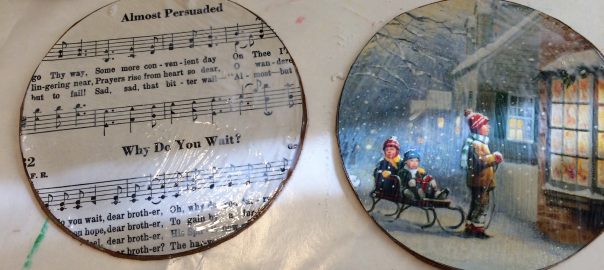
Coasters are best to gift in a set of 2 or 4. You’ll need thin cork sheets for the back, and pretty maps, cards, or sheet music for the decorative tops of the coasters.

You’ll also need something circular that’s slightly larger than a large coffee mug to use as a template, some good scissors, and a good decoupaging glue like Mod Podge.

Using your circular template (Kaye suggests that a plastic lemonade-mix container is a good size!), cut out circles of cork, and circles of your decorative top layer.

Kaye advised you can get sheets of cork at Lowes, both with and without a sticky backing. We used the ones with a sticky backing because it’s so much easier to just peel off the paper and apply the decorative top layer, no additional glue needed (yet).

After you’ve lined up your decorative top-layer on top of the cork backing, you’re ready to apply the decoupage glue to seal your coasters.


You’ll need to apply a layer of Mod Podge, let that dry for about ten minutes, and then apply another layer. Let the final layer of glue dry for at least 24-hours before packaging them up. Tying up your set of coasters with raffia or ribbon is a nice, easy way to keep them together!

The best part of this gift is that you can so easily customize it to match what your gift recipient likes! Sheet music for a music-lover, maps for a traveler, there’s no end to how you could make these for your loved ones.
Stay tuned for more Gifted2Give crafts, coming right up!
December 2010 Soul and Solace
Tuning In
As I slid into a fast-food restaurant booth to do my daily writing, the intro to “I Love You Just the Way You Are” sifted down to me from the overhead speakers. I paused, drank in the melody, the lyrics, the way Billy Joel’s voice crooned “don’t go changing” and then intensified to sing of “unspoken passion.” The music first claimed me, then began to work transformative magic in my dry and weary soul. It opened me to a reality within my daily reality: to a world deep and true and hopeful.
This month we can gift ourselves simply by tuning in and attending to the magical alchemy of music: to guitar riffs and violin solos, to heavy backbeats and to airy melodies, to major chords and to minor. We can treat ourselves as we ride or drive, as we vacuum or launder, even as we (shudder) shop.
What’s your experience of music? What kinds of music do you enjoy? Why?
December Soul and Solace
In this season of gift giving, try giving yourself an experience. What nourishes and restores your soul? A warm bath with candles? A goodor a trashybook? A morning walk? The taste of hot apple cider? A chat with a friend?
Crazy as it sounds, schedule your “gift experience” on your calendar and hold to it in the busyness of the holidays. Then just relax into your gift and allow yourself to be in whatever state you find yourself. Afterward, you can reflect: what did I experience? how do I feel now? to what other “experience gifts” might I treat myself?