Tag Archives: paper craft

What We’re Making: Mexican Star Ornaments

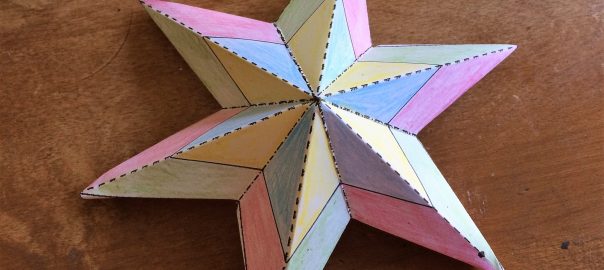
Another of our art projects last month was making Mexican Star Ornaments.  This is a neat combination of a coloring craft and a paper-folding craft, so make sure to leave time after all the coloring is done to give instructions on the folding and assembling part.

But first, some tips from our fearless leader, Kaye!

  • I found a template for a six-pointed 3-D star, then added the interior star and tabs to fold under at the tips.  The tabs especially help to keep the 3-D shape once everything is assembled.
  • I punched a small hole in one tip and added a loop of thread to act as a hanger ahead of time.  I also folded under the tabs.  You wouldn’t need to do this for some groups. Just know your peeps. 🙂
  • I printed the stars onto cardstock, so we did the coloring portion with colored pencils, because markers can weaken the paper.
  • The streamers are strips of plastic tablecover.  You could also use strips of tissue paper, ribbon, or really anything colorful and flow-y you can think of!

Here’s the star template itself:


Once you’ve printed out your star onto cardstock, let’s get to making!

First, cut out the star template from the cardstock.  Punch a hole in one tip of the star and add the loop of thread that will be the ornament’s hanger.

Now the hard part (ha, not really!): pick what colors to use!  Color your star however you choose, pastel, neon, the colors of your room, whatever you like!

Once you’ve finished coloring, it’s time to start folding.

Start by folding and then unfolding along all of the dotted lines.  After you’ve pre-folded everything your star should be flat on the table again.

Now start folding the long lines up toward you, and the short lines down away from you.  The long lines will poke up like mountains, and the short lines will point down like valleys.

Next, flip your star over.  Glue little streamers to each tip of the star (except the one that has the thread loop for a hanger already).

For the final touch, fold those flaps on the edges back over the tip to encase the streamer.  Where the flaps overlap glue them together.  This will help the star to keep its 3-D shape.

Now your star ornament is done and ready to hang!  I like how Kaye has hers in a window, it looks so festival with all of the sunlight.

And here are our fellow artists in action!

Wouldn’t a few of these strung together in a garland look so neat?  You could alternate them with your papel picado!

Happy creating everyone!


What We’re Making: Papel Picado

Last month we did a couple of art projects from Mexico for Cinco de Mayo.  One of them was the traditional papel picado, or “pierced paper”.  I love the delicate designs you can make with this technique.

Here are some tips from Kaye!

  • I folded the tissue paper and pinking sheared its bottom edge so participants would know where the top was.
  • I cut cardboard templates for various shapes and, with colored marker, marked the edge that runs along the paper’s fold line. Since the templates are 1/2 the finished shape, I labeled each one with its shape: valentine, star, 4-point star, oval, diamond, etc.
  • I provided pencils and light-colored pencils for tracing, because markers seep through tissue paper. The light-colored pencils work best on the dark-colored tissue paper.

Now let’s get to making!

Take your already fan-folded paper and choose what shapes you’d like to put on it, and where you’d like those shapes to go:

Trace around the shape templates with a pencil.  Trace lightly, we don’t want to tear the paper!

Take your scissors and cut out the traced shapes.

Then unfold the paper to reveal the pattern of shapes!

(You can see in the above picture that, in addition to folding the papers into the fan-fold ahead of time, Kaye also added a top flap to aid in the next step.)

Now we just need to add a cord you so can hang your creation!  Lift up the top flap on the paper and run a glue stick along the fold line.

Lay a piece of string or cord along the line of glue, fold the top flap back down over the cord, and press firmly to make sure everything sticks where it should!

And now you’re done! Hang up your papel picado in a window to show it off!

What shapes would you put on your papel picado?  I like all of the star options myself. 🙂

Happy creating, everyone!

What We’re Making: Spring Collages

We’ve had a delightfully long spring here in Austin this year; temperatures have been mostly in the mid-80s so far, instead of already being in the high-90s like normal!  It’s the little things in life. 🙂

Recently we made spring flower collages with our groups, using all sort of fun colors and materials.  The main event, though, was using coffee filters to make flowers: the porous nature of the filter paper means that markers make a nice watercolor effect on them.

First up for this craft, here are some tips from Kaye!

  • I prepped the coffee filters by cutting them from the rim into the center so they fan out like flower petals.  If your group has enough time and fine-motor skills they could do this step themselves.
  • You can use any markers to color the coffee filter flowers, but to get the perfect circles you see in our pictures we used bingo markers (sometimes called bingo daubers).  They’re just markers with a flat top used for marking bingo-cards, or in our case, for creating a lovely polka dot effect!

Let’s get to making!

Things you’ll need:

  1. White and green construction paper
  2. Coffee filters
  3. Cupcake liners
  4. Candy liners (same as the cupcake liner but smaller, like for peanut butter cups)
  5. Crayons
  6. Markers and/or bingo markers
  7. Scissors
  8. Glue sticks
  9. Green ribbons, strips of construction paper, or rickrack

You’ll want to decorate your main, coffee filter flower first; the dye from the markers makes them pretty flimsy, so we’ll need to give them time to dry before we glue them onto our final collage.

Here’s the design Kaye made on hers:

Next, create another flower or two with the cupcake liners and candy liners.  You can color on them, cut the edges of the liners into a new petal shape… You can even layer them to create the look of a daffodil!

Once you’ve made all the blooms you want, we can start on our sky.  Taking an unwrapped blue crayon (or, hey, whatever color you want, it’s your sky!), rub the crayon gently over the surface of the paper.  You should get a nice textured effect from the paper.

Then, take another sheet of paper (or scrap paper) and tear it up into your clouds!  Any shape you like!  Glue them onto your sky with a glue stick.

Hopefully your flowers are dry and ready to put on the collage now.  Using the glue stick, glue the flowers where you’d like them on your sky.

(Hint: If you use glue only on the center of the flowers, the petals will stay loose and have a little movement to them, like they’re blowing in a nice breeze.)

Then give each flower a green stem!  You could draw this with marker, use a green ribbon or rickrack, or use a strip of green construction paper.

Finally, let’s add some green grass!  Cut a strip of green construction paper so that one edge looks like fringe; run your finger along the fringe gently to sort of tousle the grass.  Glue the uncut edge to the bottom of your sky.

Your collage is complete!  You can also draw on some bugs if you’d like, or add your name to your masterpiece for full artistic flair.

Here’s a sample of the great collages our groups made:

What have you been making this spring?  We’d love to hear other fun group art project ideas in the comments, or send us a message on Facebook!

What We’re Making: St. Patrick’s Day Weavings

Here at A Spacious Place we like group art projects of all kinds.  This one is especially good for groups that benefit from the calming, repetitive, fine motor coordination of weaving.

We did these in the colors of the Irish flag to celebrate St. Patrick’s Day, and added some shamrocks for additional flair. 🙂 But you could do these in any colors for any holiday, or maybe in your school colors, or really in any color combo you’d like!

Here are Kaye’s notes to help you get set up:

  • To prep the materials, use an Exacto knife to cut 2″ slits horizontally across 12 x 18″ green construction paper.  Then, using a paper cutter, cut 2″ strips (vertically) from 9 x 12″ white and orange paper.
  • With a heart-shaped hole punch, I cut hearts from green-patterned scrapbook paper. With the tips turned inward, 3 hearts make a shamrock and 4 a four-leaf clover.

Let’s get to making!

With you green paper on the table horizontally, take a strip of white or orange paper and begin weaving it through the green paper, alternating over-and-under:

Add the next strip weaving the opposite pattern, under-and-over:

Keep adding strips in white and orange until you’ve filled up the green paper:

To secure your paper strips in place, glue the ends down with a glue stick:

Now it’s time to decorate!  Take three or four of the green hearts and fold them in half for a 3-D effect:

Place the hearts on the white and orange squares of your weaving.  Glue them with the bottom of the hearts pointed inward to make a shamrock or four-leaf clover!

Then add the stems with a green marker:

Your weaving is ready to display for the holiday!

What crafts did you do to decorate for St. Patrick’s Day?  We’d love to hear, leave a comment below!

What We’re Making: Lunch Bag Turkeys

A Happy Belated Thanksgiving to you all!

We made these fun turkeys out of brown paper lunch bags a few weeks ago.  They’re fun to make and then they can sit on a shelf or mantle bringing holiday cheer throughout the Thanksgiving season. 🙂

Here’s how to make them!

Start with a brown paper lunch bag and some newspaper.  Stuff the newspaper into the bag.

0191bf9ce13840dfdf5480f6bcefa82d792c5821d5-2 011fa0dbb58229159ac035231ee12efdf338881ff7-2

Twist the bag shut and secure it with a piece of chenille stem (you can cut them in half or even thirds to make the most of your resources).

01d5416e316135971d2cace212bb835e4aa0b81bfd-2

With scissors, cut the bag into strips from the edge to to the stem.

01ab8ae3ca8d68ded38373a76c748a3096942c1d47-2

Color your turkey head with colored pencils or markers.  Make sure to get the beak and waddle, and glue on some fun googly eyes.

01c25958cb15252bbcdc0d1fc76e30b905fd793ff8-2

Glue the turkey head to the bottom of bag, like so:

01193498ec645307cd13efc83e2ae90131607ce839-2

Glue some colorful tail feathers to the strips at the other end of the bag.

01484f1c7f1bb29f9b5778bc6d9182f629bb117aaf-2

Your turkey is almost done now!  It just needs legs!

01d06534be5e1a4a8d106fb50982ab1bce9b03141e-2

Accordion fold two strips of red paper, then glue on some turkey claws to the ends of the strips.
012382381d4b88179778dbfc210c923f45626b2cf8-2

Glue the end opposite the claws to the underside of the bag, under the turkey head.

0128529411fb223827ecb55e1d8b8c3459ef6a40a0-2

Now your turkey is ready to celebrate Thanksgiving with you!

012f3493dafdc9178ea2a877ebd3deec30ec27083f-2 019fd9a1b545f9dcc4992acb134947583e66d321b0-2 0117ac8579a7e739027d43b0c879d9480f9f42e394-2 010e2ab11122352182ef7a8a8bee608558d86ee1c0-2 01dee55e9d1c6dfd7ef07c36a31cf14772e4fe480a-2 01a8c221e55b84d8889af2b970084f53df97e199ab-2

Here’s to the Thanksgiving spirit lasting all year long!

What We’re Making: Paper Plate Owls

We made owls out of paper plates the other day, and look how fun and fall-like they turned out!

01a31d05edf9acabf6679ed2317d2c736bd08fafa7-2

Some tips from Kaye:

  • Tracing the fold lines on the plate’s back helped our folks with the logistics of the process.
  • I sorted the eyes, eye pupils, beaks, and talons (we provided a choice of color in all) into egg-carton sections for transport.
  • A stapler helped hold the folds in place for easier coloring.
  • In a room with a blank wall, it would be fun to craft a huge tree from brown wrapping paper and set the owls to roost.

Here’s the full how-to!

Draw the following fold-lines on the paper plates:

0107ca3996a667cea945abda7dd1686e6e093c169d-2

In the center of the plate draw rows of scalloped lines to be the owls chest feathers:

0186876d2d791113c5b2d44e92d6c786346d6156d1-2

Fold in the sides along the lines.

01c3330ff51f68c75f39bb41e6b5c67f991aa130b6-2

Color the wing feathers:

0142aac53fd886f7c3ede4b4dd2a480d89ffb6cd6e-2

Fold down the top part of the plate.  This will be the owl’s head.  Staple it to keep it in place.

01989cea944dd5927ed56dada223a8bbbb92b66132-2

Color the owl’s head.  You could make it match the wing feathers, or make it stand out.

0130150a58db38add9fb8fb4df5868a40ad32aa334-2

Make a pair of eyes for your owl by gluing small circles inside large ones.01f8bf482a0c11bae2285791f3d582a93ee75212fb-2

Glue the eyes onto the owl’s head.  Also glue on a beak.

017f1265cae830282125b85f9f124cfaf67b31a09c-2

Give your owl some talons.

017400eaddac9f4ebb0499fb969e4019bfca9c557f-2

And you’re finished!  What is your owl’s name?

01a31d05edf9acabf6679ed2317d2c736bd08fafa7-2


What We’re Making: Fish in Motion

Don’t these moving fish look neat!?

01f256fad430f97c8156fd8a0e681041e850d4139f-2

Kaye found the instructions for these here, just follow the link for their excellent walk-through!  There’s a definite origami feel to the first few steps (folding the paper to make it a square, making further folds and then unfolding).  Once you get to cutting you may need to assist participants with not cutting too far into the paper.  Kaye said she also provided templates for the lower jaw, back fin, and side fins for those who wanted to use them.

01d4d5ba990aaae8ef5dd475083cb45e933da16d7f-2

01fcc117da75a16b11a43205d822450413a1f01a5d-2

This was a really fun papercraft, taking something solid and making it move.

01a7e4c86404cf80ad85a32712dfe4352fc93e6c27-2 01f075ac1c4689e5ce7dde189453ea9ba83f444637-2

I think these would be really cool to hang on the wall next to some watercolor jellyfish!

Happy creating, all!

What We’re Making: Leis and Surfer Shirts

Maybe it’s almost fall, but here in Texas, it still feels like summer.  And to me, summer means going to the beach!  In August we made our own leis and surfer shirts with our groups to really get in the spirit of the season.

0152a4236af8a3772ec7fd2f73733819f27783ece7_00001-2

The leis were made from construction-paper flowers interspersed with sections of straw.  Kaye prepped the flowers and straw pieces ahead of time, and also wrapped one end of the string in tape for easier stringing.  Once on site she taped the strings to the table at each participants place, leaving enough room to knot the leis after the participants were done.  She said this made tying the final necklace together much easier!

01ad4ae5a2645b4023a72d097ea33372bee23a3322-2 01bbeb5d1974f7c130f5f84364514bbdbab4dd5652-2


For the surfer shirts, Kaye cut shirt-front shapes from butcher paper.  To decorate the shirts, we provided both watercolor markers for drawing, and sponge stampers and ink pads for flower-making.

014b9800b8b485dde761bb4675aba64e927687074c-2 01520eaa860370a6097ff796b79466e02f074000d8-2 01ee0ee850d9c2ef78618085a06ea35c41bb5c54f5-2

Then everyone could pin on their surfer shirts and put on their leis and be all set for the beach!

0185a2cd91d44ac980800de5b5feb3eafa2f795a2c-2 01f2a651a0fc827026cbfe28d0f7886ff7af93b0f9-2 01e7f6b71a01466f4b937e1fe392569cff3858a83a_00001-2

Did you go to the beach this summer?  Show us your fun beach attire!

What We’re Making: Spring Bouquets

A Mother’s Day Spring Bouquet!  Earlier this month our participants made flowers for someone special in their life.  This paper craft was simple to do and the results just burst with color and life!

014fb234fc1cb6cdf60f45c4ceedf729c29e4fe415 (2)

Take a piece of green construction paper and draw even lines across the short edge (this may be best to do ahead of time for a large group, as it’s the most time consuming part).

01459f2a81652ac2772ee6625a21b5c55a33a7424a (2)


Then fold in half length-wise and cut the down the lines.  Make sure they stay connected at the bottom!  (But, if not, there’s always tape. :-))

0188af7c4f2fe8812ebb4e2af7b46cba947110b4ee (2)

Take a paper candy cup and cut the folded edges in toward the center to create petals.  Then color the centers and petals if you wish!

0116f3867a9923c8b0536161595ee2ec7d7750cada (2) 015a2142e3d1d6ca662031900a0c59cc78760a383d (2) 0104fb58e6491185ea6b5b1b2294d003a1ade3a75a (2)

You can cut other flower shapes (like this tulip shape) out of pretty construction paper, or patterned scrapbook paper.

018715cca6bb9bd5644fd3aedd082952e1adc8acd7 (2)

Glue your blooms to the top of your green stems.

0123d847374f7030718a2adcfb8c1894c3cadbcbc2 (2)

Then roll the green piece of paper into a circle and secure with a paperclip.  Voila, a lovely bouquet!

01ac12c20ab2b20f69a16a4950989ed1e4329c99db_00001 (2)

You can also tuck a card among the flowers if you’re giving them as a gift.

010d182cc69bf95fcdb6579937a978b0e629e6a0f4 (2)

Here’s some pictures of our participants at work!

0144cdf6d08ae12e0bcc0f4d6e5edb30c38be39939 (2) 0121db94b2fab84bceb124de95c4502a9c8e2c0ac2 (2) 018d5910c897ee1e3583ca98b9ecb55927e9112e0a (2) 014eea4b919a9f32054f0f73bf7179b00b469e9f54 (2) 01e38e2db771874d6c3b64f0efd3f75301891d826d (2) 01de6d0de2eea5e19a81bff3439824d0fcc9181ebd (2) 01cf7f575ecf20484e9eabe0d55feb083c6b9c7cff (2) 01adff681cd0263253d70ab3ee8d8ec9423690dcad (2)

Who in your life could use something springy to brighten their day?  Why not make them a lovely bouquet!?

What We’re Making: Swedish Heart Valentine Card Holders

Another Valentine’s Day has come and gone; did you make anything fun to celebrate? Maybe baked something tasty for a loved one, or gave a friend a Valentine’s card?

We made Swedish Heart Valentine Holders with our groups last week.  Really simple, but a pretty and useful craft as well!

011494a460cd122d73632de9bfbf19416913dfd1e5 (2)

(And sure, these are normally a Christmas-time decoration in their native Sweden, but with their fun heart shape our participants loved doing them for Valentine’s.)

The basic steps are, once you’ve cut out two shapes like this:

0183704b9cfe6ceb387003e95e71977b3061cd615b (2)
You weave the strips together to make something like this:
012cca8791e0606072d21e17f2dfc4fe1b0db4edbb (2)
Using liquid glue, glue two Swedish Hearts together along the bottom two straight edges.  Make sure to leave the curved part unglued so you can put your valentines inside!
Add you name to the front and you’re done!
01ce519bc13a5d51106a646e1765501dfd5f7b03dd (2)
Some tips:
  • We cut the initial shapes for the Swedish hearts ahead of time, since not all of our participants have the kind of fine-motor skills this step calls for.
  • We did, however, have them cut out the name plate hearts for the front of their card holders.  It’s always fun to see that half-heart shape open up to a symmetrical heart!
01dd84c4e1f21b8374b172a678bbe9a1c6651f7b5b (2)
013982fb8778805f3687e75b8812103a2665c6a324 (2)
015ffa52bbb807eeb65c850fae29be2238e3783e2b (2)
  • Finally, it really is easiest to use two different types of glue for this project: glue stick for gluing the ends of the strips to the final edge of the heart (do this as you go along or when all of the weaving is done), and liquid glue to get the two large hearts connected to make the card-holding pocket.  I know two glues sounds like overkill, but they really do their jobs well here!
Everyone had so much fun making all of the pieces for  their hearts and decorating them!
0159bb6e67451ba3fb762004984cc1094c3ca71fa3 (2) 01707d692422ac867925263a857bbc1b4d288968ba (2) 016e9594834f37a335bcb1be56229b32aa8240b508 (2) 011494a460cd122d73632de9bfbf19416913dfd1e5 (2)
Happy Valentine’s Day, everyone!