Category Archives: Creativity/Spirituality

Musings/thoughts/questions about creativity and spirituality

What We’re Making: Papel Picado

Last month we did a couple of art projects from Mexico for Cinco de Mayo.  One of them was the traditional papel picado, or “pierced paper”.  I love the delicate designs you can make with this technique.

Here are some tips from Kaye!

  • I folded the tissue paper and pinking sheared its bottom edge so participants would know where the top was.
  • I cut cardboard templates for various shapes and, with colored marker, marked the edge that runs along the paper’s fold line. Since the templates are 1/2 the finished shape, I labeled each one with its shape: valentine, star, 4-point star, oval, diamond, etc.
  • I provided pencils and light-colored pencils for tracing, because markers seep through tissue paper. The light-colored pencils work best on the dark-colored tissue paper.

Now let’s get to making!
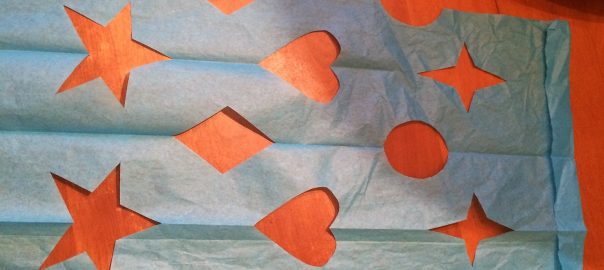
Take your already fan-folded paper and choose what shapes you’d like to put on it, and where you’d like those shapes to go:

Trace around the shape templates with a pencil.  Trace lightly, we don’t want to tear the paper!

Take your scissors and cut out the traced shapes.

Then unfold the paper to reveal the pattern of shapes!

(You can see in the above picture that, in addition to folding the papers into the fan-fold ahead of time, Kaye also added a top flap to aid in the next step.)

Now we just need to add a cord you so can hang your creation!  Lift up the top flap on the paper and run a glue stick along the fold line.

Lay a piece of string or cord along the line of glue, fold the top flap back down over the cord, and press firmly to make sure everything sticks where it should!

And now you’re done! Hang up your papel picado in a window to show it off!

What shapes would you put on your papel picado?  I like all of the star options myself. 🙂

Happy creating, everyone!

What We’re Making: Spring Collages

We’ve had a delightfully long spring here in Austin this year; temperatures have been mostly in the mid-80s so far, instead of already being in the high-90s like normal!  It’s the little things in life. 🙂

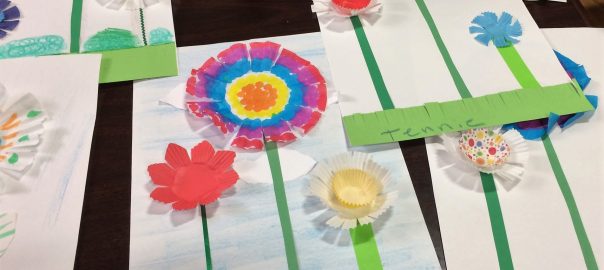
Recently we made spring flower collages with our groups, using all sort of fun colors and materials.  The main event, though, was using coffee filters to make flowers: the porous nature of the filter paper means that markers make a nice watercolor effect on them.

First up for this craft, here are some tips from Kaye!

  • I prepped the coffee filters by cutting them from the rim into the center so they fan out like flower petals.  If your group has enough time and fine-motor skills they could do this step themselves.
  • You can use any markers to color the coffee filter flowers, but to get the perfect circles you see in our pictures we used bingo markers (sometimes called bingo daubers).  They’re just markers with a flat top used for marking bingo-cards, or in our case, for creating a lovely polka dot effect!

Let’s get to making!

Things you’ll need:

  1. White and green construction paper
  2. Coffee filters
  3. Cupcake liners
  4. Candy liners (same as the cupcake liner but smaller, like for peanut butter cups)
  5. Crayons
  6. Markers and/or bingo markers
  7. Scissors
  8. Glue sticks
  9. Green ribbons, strips of construction paper, or rickrack

You’ll want to decorate your main, coffee filter flower first; the dye from the markers makes them pretty flimsy, so we’ll need to give them time to dry before we glue them onto our final collage.

Here’s the design Kaye made on hers:

Next, create another flower or two with the cupcake liners and candy liners.  You can color on them, cut the edges of the liners into a new petal shape… You can even layer them to create the look of a daffodil!

Once you’ve made all the blooms you want, we can start on our sky.  Taking an unwrapped blue crayon (or, hey, whatever color you want, it’s your sky!), rub the crayon gently over the surface of the paper.  You should get a nice textured effect from the paper.

Then, take another sheet of paper (or scrap paper) and tear it up into your clouds!  Any shape you like!  Glue them onto your sky with a glue stick.

Hopefully your flowers are dry and ready to put on the collage now.  Using the glue stick, glue the flowers where you’d like them on your sky.

(Hint: If you use glue only on the center of the flowers, the petals will stay loose and have a little movement to them, like they’re blowing in a nice breeze.)

Then give each flower a green stem!  You could draw this with marker, use a green ribbon or rickrack, or use a strip of green construction paper.

Finally, let’s add some green grass!  Cut a strip of green construction paper so that one edge looks like fringe; run your finger along the fringe gently to sort of tousle the grass.  Glue the uncut edge to the bottom of your sky.

Your collage is complete!  You can also draw on some bugs if you’d like, or add your name to your masterpiece for full artistic flair.

Here’s a sample of the great collages our groups made:

What have you been making this spring?  We’d love to hear other fun group art project ideas in the comments, or send us a message on Facebook!

What We’re Making: St. Patrick’s Day Weavings

Here at A Spacious Place we like group art projects of all kinds.  This one is especially good for groups that benefit from the calming, repetitive, fine motor coordination of weaving.

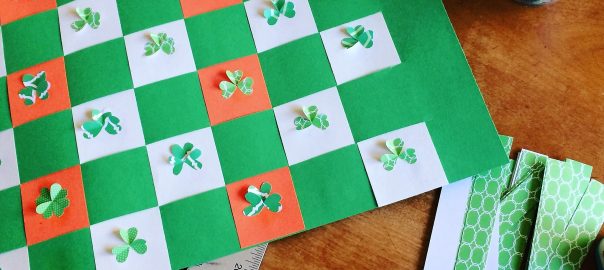
We did these in the colors of the Irish flag to celebrate St. Patrick’s Day, and added some shamrocks for additional flair. 🙂 But you could do these in any colors for any holiday, or maybe in your school colors, or really in any color combo you’d like!

Here are Kaye’s notes to help you get set up:

  • To prep the materials, use an Exacto knife to cut 2″ slits horizontally across 12 x 18″ green construction paper.  Then, using a paper cutter, cut 2″ strips (vertically) from 9 x 12″ white and orange paper.
  • With a heart-shaped hole punch, I cut hearts from green-patterned scrapbook paper. With the tips turned inward, 3 hearts make a shamrock and 4 a four-leaf clover.

Let’s get to making!

With you green paper on the table horizontally, take a strip of white or orange paper and begin weaving it through the green paper, alternating over-and-under:

Add the next strip weaving the opposite pattern, under-and-over:

Keep adding strips in white and orange until you’ve filled up the green paper:

To secure your paper strips in place, glue the ends down with a glue stick:

Now it’s time to decorate!  Take three or four of the green hearts and fold them in half for a 3-D effect:

Place the hearts on the white and orange squares of your weaving.  Glue them with the bottom of the hearts pointed inward to make a shamrock or four-leaf clover!

Then add the stems with a green marker:

Your weaving is ready to display for the holiday!

What crafts did you do to decorate for St. Patrick’s Day?  We’d love to hear, leave a comment below!

Rockhopper Penguins

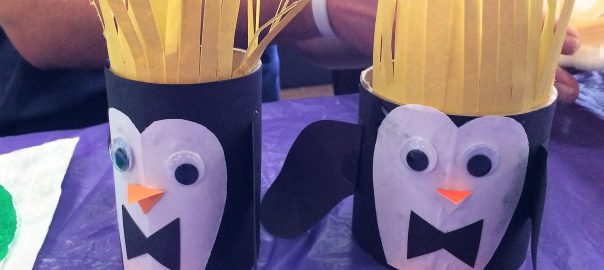
Aren’t these penguins just the cutest?!  They’re made from toilet paper rolls, or really any cardboard tube you like, so they’re just the perfect size to hang out on your desk.

First up, here are Kaye’s tips for making these with a group:

  • For groups with fine-muscle control, we provided templates for feet, beaks, and wings, so they could trace and cut out the shapes themselves.
  • For others we cut these shapes out ahead of time and encouraged them to consider placement.

To make your own penguin buddy, you’ll need:

  1. A toilet paper roll, or any carboard tube cut to any height you like
  2. Black, white, orange, and yellow construction paper
  3. Scissors
  4. Liquid glue
  5. Googly eyes
  6. A pencil

First, glue black construction paper to the outside of the cardboard tube:

Next, using the template, cut out the white for the penguin’s belly, and glue it onto the cardboard tube.

Then use the wing-shape template to cut two out two black wings.  You can curl the tips up with a pencil to make them look even more wing-like.  Then glue them to the side of the cardboard tube.

And we’re on to the feet and beak!  Using the templates cut out two orange feet and an orange beak, and glue them onto your penguin.

Then glue on some googly eyes!

So now you have a normal, fun penguin. BUT we’re making rockhopper penguins, whose main feature is… their yellow crown feathers!

Those are easy to make, you take a strip of yellow construction paper, and cut one edge into fringe.  Glue the other egde into the inside top of the cardboard tube and behold your rockhopper friend!

If you want you can even dress your penguin up!  How about a festive bow tie?

Our participants loved making these guys, they’re so fun and friendly.  If you make one please share a picture with us on our Facebook page!

Gifted2Give: Duct Tape Belts

Wearable gifts are always a hit at Gifted2Give, and who doesn’t love the incredible versatility of duct tape?  Add in all of the neat patterns you can find it in and we’re in gift-customizing heaven. 🙂

Here’s how to make a duct tape belt!

First, some tips:

  • It helps to have a long table for laying out the belts.
  • Also, keep fingernail polish on hand to clean the scissors, since the duct-tape glue gunks them up.

You’ll need:

  • Various cool patterns of duct tape (camo, sports teams, and animals prints always go over well)
  • 1 1/2″ D rings for the large belts (we get a variety of silver, gold, and nickel)
  • Binder rings for the small belts (these only come in silver, I think)
  • A long strip of posterboard 1 1/2″ wide, to act as a sizer
  • Scissors
  • Pens

Wrap the posterboard sizer around your waist to get a measure of how long to make the belt.

Keeping your finger on the right spot on the sizer, lay it out on the table.   Stretch a piece of duct tape to that length plus six inches.   Stretch out another piece the same length.

Carefully match up both pieces of tape, sticky-side to sticky-side, until you have one long piece of duct tape with the design on both sides and no sticky-side showing.

Since the duct tape is 2″ wide, and the D-rings are only 1 1/2″, you’ll need to cut the tape down to the narrower size.  Lay the sizer on top of the belt, and trace the edge with the pen.  Then use the scissors to cut the edges off the belt.

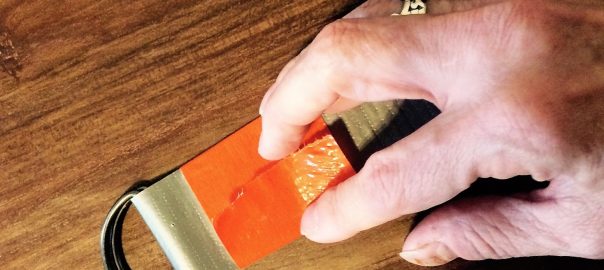
Now take two D rings and slide them over one of the ends of the belt.  Fold the end of the belt over the D rings and tape it to secure the rings in place.  You can use either the same pattern of duct tape for this, or a different color or pattern for a cool contrast effect.

**Want to make a thinner belt?  Using only one strip of tape, fold it length-wise in thirds, then use the binder rings instead of the D-rings.**

Now you can wear your belt!  What colors and patterns would you use for a duct tape belt?  Or what colors and patterns would you use for a duct tape belt gift?


Gifted2Give: Tape-Transfer Word Jars

Another fun gift-worthy craft!  We made this at last year’s Gifted2Give event with winter holiday gift-giving in mind, but as there’s always a fun holiday coming up they can really be a year-round activity.  Valentine’s gift, perhaps? 🙂

First, a few tips from Kaye!

  • To get the labels off of the glass jars, I discovered that soaking them in hot, soapy water for a day helped get off most of the labels. With the really stubborn ones, I followed up with a paste of baking soda and vinegar, and with even more stubborn ones I used fingernail polish remover.  Some just were too hard to remove, so don’t feel bad if you try and try and one or two still won’t fully come off!  Just use the other ones.
  • Rounded sides on jars made adhesion more difficult, because the transfer can’t lie flat.  If you can find more flat-sided jars, use those!
  • When making the transfers, soak, remove the paper, and let dry sticky-side-up for a few minutes. Once dry, the tape will become sticky again.
  • You’ll need to print your chosen words using a laser printer, as the inkjet printing process doesn’t allow the ink to be separated from the paper with this method.

Let’s get started!

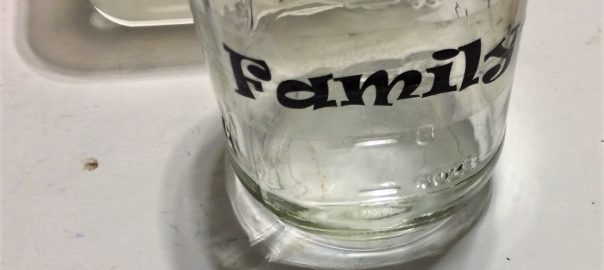
  • Choose the word you would like to put on your jar.  We printed out words like Family, Love, Peace, and Gratitude.  You can go serious or funny with your words/phrases, or you could use the recipient’s name, too.
  • Print your words and phrases using a laser printer.
  • Cover your printed words with clear packing tape.  Try to cover each word with just one piece of tape so you don’t have any seams in your final label.
  • Using your thumbnail or the back of a spoon, burnish the tape firmly all over the word.  You want the tape to be as completely and firmly adhered to the paper as possible.

  • Cut out your word or words, leaving a border around the edges.  The shape of tape that you cut out in this step is the shape that the final label will be, so keep that in mind.

  • Choose the jar you’d like to label.  Make sure the word you chose fits on the jar!

  • Fill a small bowl or plastic container halfway with water.  Submerge your word fully in the water for 1.5-2 minutes.  The entire strip of paper needs to be fully submerged the whole time.

  • Remove the paper from the water and begin to rub the paper-backing off of the tape.  If it doesn’t all come off you can soak in the water again until you can rub all of the paper off.

  • Once all of the paper is removed, lay the label sticky-side-up on a paper towel.  Let dry three minutes so the tape will regain its tack.

  • Once its dry, apply your custom label to your jar!  Smooth out any bubbles with your finger.

  • For added decoration you can tie a ribbon around the neck of the jar, or glue some along the edge of the jar lid.  Now your jar is ready to gift!

These would be so fun to fill with homemade bath salts, or cookie mix, or a bunch of new colored pencils, or a bunch of fun notes to your giftee… Anything you think they would like!  What word would you put on a jar as a gift?  What would you put inside it?  It’s so fun brainstorming what your loved ones would like as a gift, isn’t it?

Gifted2Give: T-Shirt Headbands

Another gift-able item we made at this year’s Gifted2Give was t-shirt headbands!  This was a new craft for 2016 and it was a HUGE hit.

Here are Kaye’s notes on prepping the materials for this craft:

  • From the t-shirts, cut strips at least 4 inches wide across the width of the shirt.
  • You can start at the hem, so you don’t need to cut that portion off.
  • I found that medium to large size shirts worked best.  Smalls were too tight unless paired with a strip from an extra-large shirt, and the extra large ones were too large, unless paired with a small.

And here’s how to put one together!

Take two t-shirt strips.  They can be the same color or different, coordinating colors.

019b9a87d809695560015cef2182a0c9f4641c198c (2)

Form each into a “V” shape, then interlock those Vs.

018df14ee126ac2f3a80da056cfff5669208ff5bd3 (2) 01ee5b90bfb0c01ca255b2f475ee8e9e2b62e74406 (2)

Bring the ends of one band together, and stitch an anchor stitch in each corner.  Repeat with the other band.

010540e335f0e514ec01418270f7f3a49c3054ed3e (2) 0109285a7121f7244ae85134051ead4fb75f10dfc8 (2)

Stretch the bands, if needed, to fit around the head.

01d1e725b89691e8ac8a04f0931e72c1bf0c77a029 (2)

Line up the ends of the bands and whip-stitch all four layers together, first in one direction, then in the other.

01b923237375be03594f085a35c21c57732d424a84 (2) 01b35f83d042e0abe0976658581ac3eaaa11991036 (2) 01559cc643a8454c93d7741a68110ea7083520ef86 (2) 010f7898205858571c7c39830f8ddbd055ad384592 (2)

Then pop it on, your headband is ready to wear!

01a82b5647c6ff6348755e1f166248c0b85e2ba63d (2)

This is another great gift that you can customize SO easily for your gift recipient.  Use their favorite color, or their favorite sport team colors, or make some in various holiday colors; there are just so many great options!

Did you make any gifts for the holidays this year?  Tell us about it in the comments!  We’re always looking for new ideas for the next Gifted2Give!

Gifted2Give: Cork Coasters

Every November we put on an event called Gifted2Give, an afternoon where participants can make holiday gifts for only the cost of materials.  It’s a fun day of crafting, music, snacks, and holiday cheer!

Here on the blog we’re going to be posting some of the crafts we’ve done at Gifted2Give over the years.  First up, cork-backed coasters!

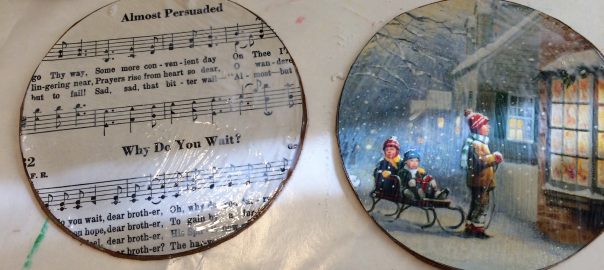
Coasters are best to gift in a set of 2 or 4.  You’ll need thin cork sheets for the back, and pretty maps, cards, or sheet music for the decorative tops of the coasters.

018230f2ebb373c2f890e852dc0e0641ff53d511ba-2

You’ll also need something circular that’s slightly larger than a large coffee mug to use as a template, some good scissors, and a good decoupaging glue like Mod Podge.

01e91f3aff408d29eb2e5c705d347d855a8d67a348-2
Matte or Glossy Mod Podge will both work. You’ll just have to pick what look you want!

Using your circular template (Kaye suggests that a plastic lemonade-mix container is a good size!), cut out circles of cork, and circles of your decorative top layer.

0170ab912d5af6f7a153cd5613a21ee9c05960896b-2

Kaye advised you can get sheets of cork at Lowes, both with and without a sticky backing.  We used the ones with a sticky backing because it’s so much easier to just peel off the paper and apply the decorative top layer, no additional glue needed (yet).

01d16425323119194464e57bfbdd5b3b8c5aafb113-4

After you’ve lined up your decorative top-layer on top of the cork backing, you’re ready to apply the decoupage glue to seal your coasters.

01e0574162a6cf39c72bd7f5a61fed15d41b37308e-2 0139bf31c4b78e4534aa0f4111bccf95d21fde8e38-2

You’ll need to apply a layer of Mod Podge, let that dry for about ten minutes, and then apply another layer.  Let the final layer of glue dry for at least 24-hours before packaging them up.  Tying up your set of coasters with raffia or ribbon is a nice, easy way to keep them together!

01d7141dd6a1ef7ba52ba8f245df13466390daab05-2

The best part of this gift is that you can so easily customize it to match what your gift recipient likes!  Sheet music for a music-lover, maps for a traveler, there’s no end to how you could make these for your loved ones.

Stay tuned for more Gifted2Give crafts, coming right up!

What We’re Making: Lunch Bag Turkeys

A Happy Belated Thanksgiving to you all!

We made these fun turkeys out of brown paper lunch bags a few weeks ago.  They’re fun to make and then they can sit on a shelf or mantle bringing holiday cheer throughout the Thanksgiving season. 🙂

Here’s how to make them!

Start with a brown paper lunch bag and some newspaper.  Stuff the newspaper into the bag.

0191bf9ce13840dfdf5480f6bcefa82d792c5821d5-2 011fa0dbb58229159ac035231ee12efdf338881ff7-2

Twist the bag shut and secure it with a piece of chenille stem (you can cut them in half or even thirds to make the most of your resources).

01d5416e316135971d2cace212bb835e4aa0b81bfd-2

With scissors, cut the bag into strips from the edge to to the stem.

01ab8ae3ca8d68ded38373a76c748a3096942c1d47-2

Color your turkey head with colored pencils or markers.  Make sure to get the beak and waddle, and glue on some fun googly eyes.

01c25958cb15252bbcdc0d1fc76e30b905fd793ff8-2

Glue the turkey head to the bottom of bag, like so:

01193498ec645307cd13efc83e2ae90131607ce839-2

Glue some colorful tail feathers to the strips at the other end of the bag.

01484f1c7f1bb29f9b5778bc6d9182f629bb117aaf-2

Your turkey is almost done now!  It just needs legs!

01d06534be5e1a4a8d106fb50982ab1bce9b03141e-2

Accordion fold two strips of red paper, then glue on some turkey claws to the ends of the strips.
012382381d4b88179778dbfc210c923f45626b2cf8-2

Glue the end opposite the claws to the underside of the bag, under the turkey head.

0128529411fb223827ecb55e1d8b8c3459ef6a40a0-2

Now your turkey is ready to celebrate Thanksgiving with you!

012f3493dafdc9178ea2a877ebd3deec30ec27083f-2 019fd9a1b545f9dcc4992acb134947583e66d321b0-2 0117ac8579a7e739027d43b0c879d9480f9f42e394-2 010e2ab11122352182ef7a8a8bee608558d86ee1c0-2 01dee55e9d1c6dfd7ef07c36a31cf14772e4fe480a-2 01a8c221e55b84d8889af2b970084f53df97e199ab-2

Here’s to the Thanksgiving spirit lasting all year long!

What We’re Making: Paper Plate Owls

We made owls out of paper plates the other day, and look how fun and fall-like they turned out!

01a31d05edf9acabf6679ed2317d2c736bd08fafa7-2

Some tips from Kaye:

  • Tracing the fold lines on the plate’s back helped our folks with the logistics of the process.
  • I sorted the eyes, eye pupils, beaks, and talons (we provided a choice of color in all) into egg-carton sections for transport.
  • A stapler helped hold the folds in place for easier coloring.
  • In a room with a blank wall, it would be fun to craft a huge tree from brown wrapping paper and set the owls to roost.

Here’s the full how-to!

Draw the following fold-lines on the paper plates:

0107ca3996a667cea945abda7dd1686e6e093c169d-2

In the center of the plate draw rows of scalloped lines to be the owls chest feathers:

0186876d2d791113c5b2d44e92d6c786346d6156d1-2

Fold in the sides along the lines.

01c3330ff51f68c75f39bb41e6b5c67f991aa130b6-2

Color the wing feathers:

0142aac53fd886f7c3ede4b4dd2a480d89ffb6cd6e-2

Fold down the top part of the plate.  This will be the owl’s head.  Staple it to keep it in place.

01989cea944dd5927ed56dada223a8bbbb92b66132-2

Color the owl’s head.  You could make it match the wing feathers, or make it stand out.

0130150a58db38add9fb8fb4df5868a40ad32aa334-2

Make a pair of eyes for your owl by gluing small circles inside large ones.01f8bf482a0c11bae2285791f3d582a93ee75212fb-2

Glue the eyes onto the owl’s head.  Also glue on a beak.

017f1265cae830282125b85f9f124cfaf67b31a09c-2

Give your owl some talons.

017400eaddac9f4ebb0499fb969e4019bfca9c557f-2

And you’re finished!  What is your owl’s name?

01a31d05edf9acabf6679ed2317d2c736bd08fafa7-2